reee was a reversing challenge during the PlaidCTF 2020. The challenge was worth 150 points, and thus being relatively easy.
The challenge
For this challenge only the binary was provided. So fire up the Disassembler of your choice and lets go. For this article I will be using Binary Ninja, but you can follow along using IDA as well. First of all, the binary is not position independent and uses a fixed base (
0x400000
) thus I will be referring to functions mainly by their address.
First steps
This is also a good time to show off the highlevel intermediate language that Binary Ninja shipped just in time for PlaidCTF.
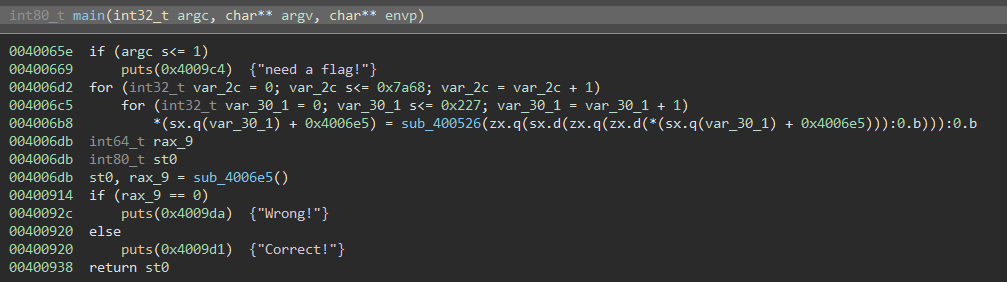
When investigating the main function, we can see that it calls two functions
sub_400526
and
sub_4006e5
. That being said, only the outcome of
sub_4006e5
seems to be relevant for the validation of our flag, as the "Correct!" and "Wrong!" strings are outputted depending on the value of EAX after the call.
So lets call
sub_4006e5
something more meaningful like
check_flag
and investigate it further.
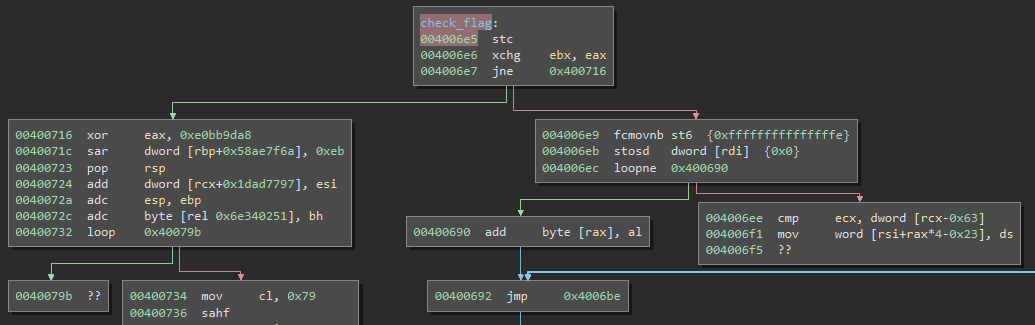
I modified the layout a bit to improve readability so the graph might look slightly different when you first open the function yourself but the content is the same. It is obvious that something seems off with this function. Paths are leading to undefined instructions ("??" in the picture), some paths would certainly lead to access violations and the used instructions appear to be too random for a legitimate function. There must be some kind of runtime modification going on, that is likely gonna happen in
sub_400526
because it is the only function called before
check_flag
.
A brief look at the function showed many movs using global variables, so I decided to go with my intuition and not look at it any further. So I loaded the binary into gdb and set a breakpoint to
0x40064d
. As soon as my breakpoint was hit, I dumped the entire module from memory.
gdb> dump binary memory dump.bin 0x400000 0x401000
This should suffice for further reversing efforts, I did not bother bringing it back into a state where it would be executable. When opening the dump file, Binary Ninja complains a bit in the log file but opens it correctly. The only interesting change is found when reopening our
check_flag
function.
But looking at the "not-so mini" Graph on the right, we see that the logic seems very complex. But this feeling only lasted until I noticed those weird conditional jumps all over the function (like the ones shown at
0x4006fc
and
0x400736
). It looks like a legitimate branch to the disassembler, but the preceding operations done on the eax register are static and don't change throughout the program flow, thus making it an unconditional jump (since the condition will always be true/false depending on the layout). This kind of obfuscation is called opaque predicates.
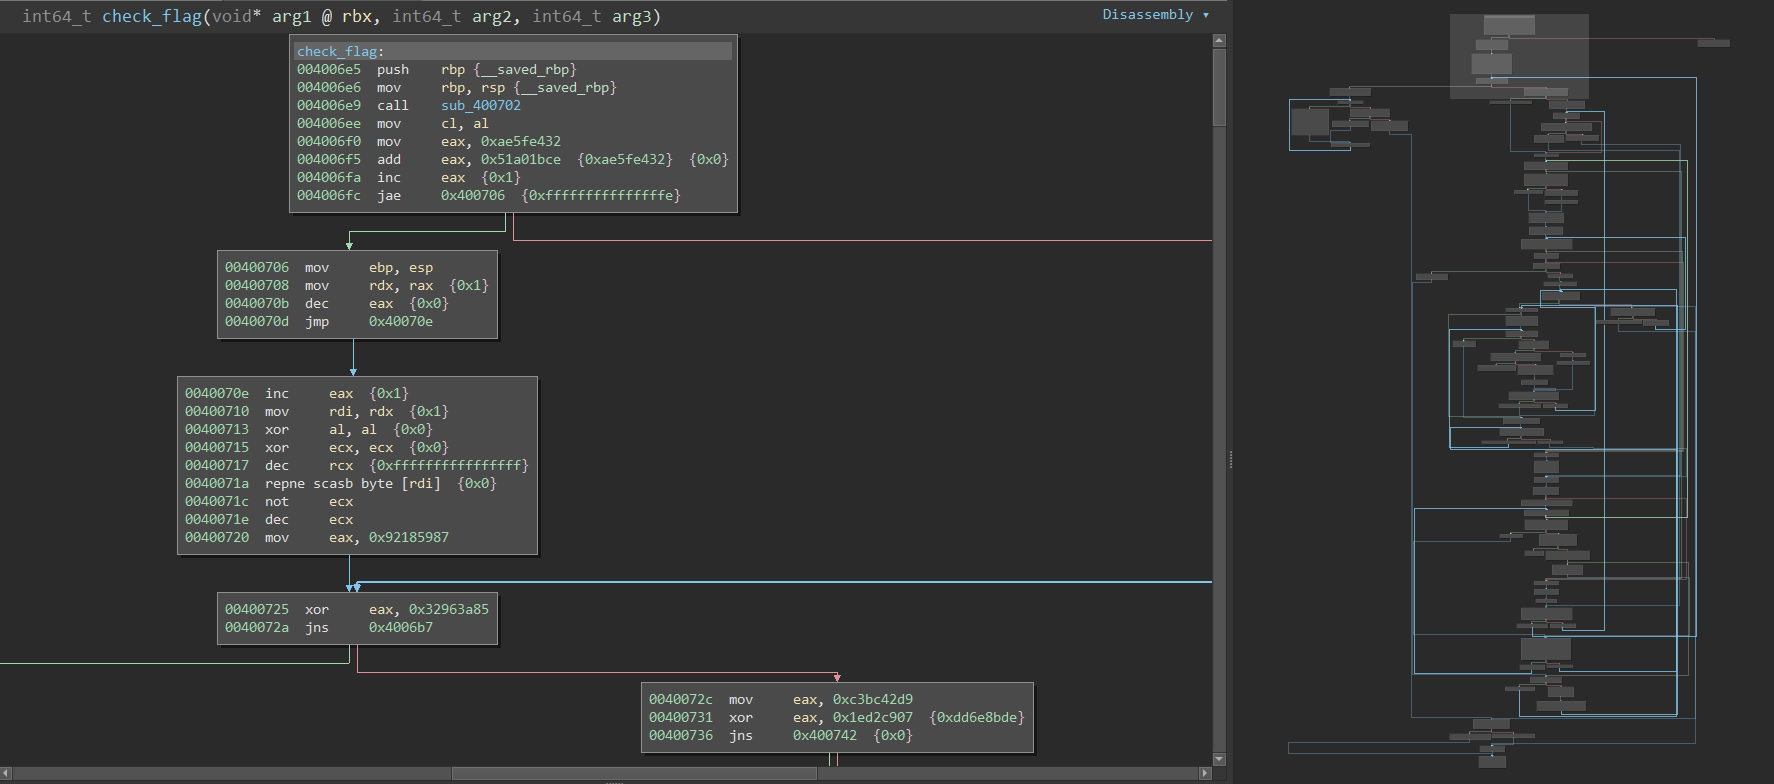
While single stepping through the function I noticed that the condition for the branches is never met, thus always taking the "false" branch marked in red. Binary Ninja offers some very convenient functionality to tackle this problem. By right clicking the jump instruction, and then selecting "Patch"->"Never Branch" the calls are simply replaced with nops and the complexity of the function is significantly reduced.
In fact our
check_flag
function is reduced to a simple wrapper around
sub_400702
as soon as the conditional jump @
0x4006fc
is removed, as the negative branch for that jump only contains a leave, ret combination. So the next target for our analysis is
sub_400702
. It turns out that this function also contains a fair amount of opaque predicates. At this point I considered writing a binja plugin to remove all of them but ended up doing it by hand cause it seemed to me like this would be less work. This reduces the complexity of the function as shown in the following picture.
Digging deeper
So now that all the anti-reversing measures deployed by the binary are defeated we can start to dig into the meaty part: The verification algorithm. I was impressed at how good of a job the binary ninja HLIL is doing with this part. Especially because the unnecessary shenanigans with the eax register for the opaque predicates were left out because they were not relevant to execution flow anymore!
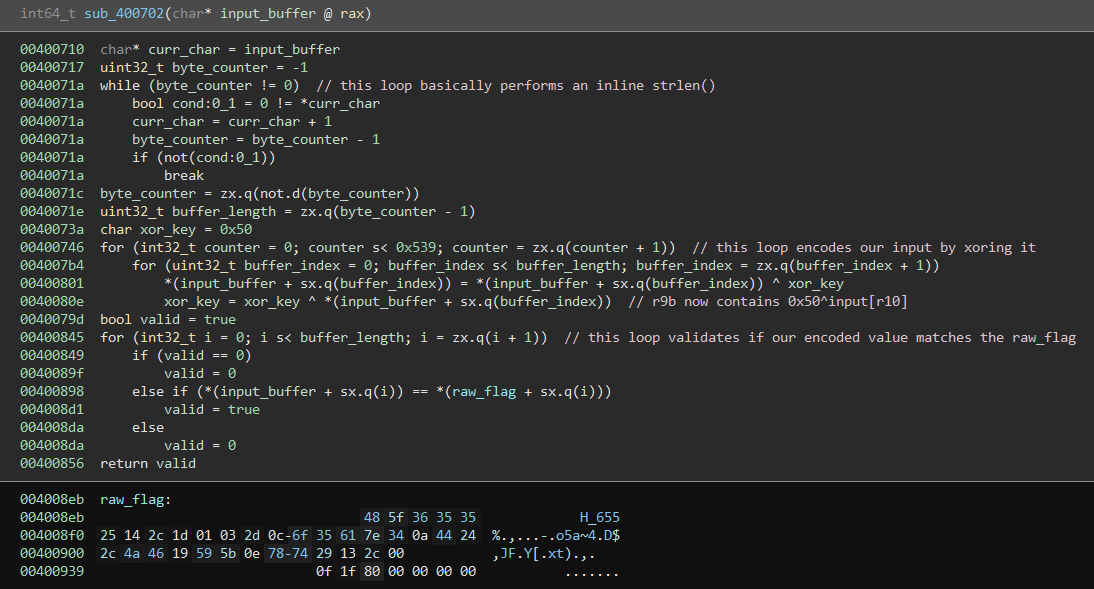
The initial "decompilation" of the function looked slightly different, so don't be alarmed if this image does not match what you're seeing. But it is trivial to reach the point where it looks identical by modifying the used types to 'char', 'bool' and provide meaningful variable names. At the start of the function a simple implementation of strlen() gets executed, which serves to determine the length of the users input. Far more interesting is the algorithm beginning at line
0x40073a
. The
xor_key
variable is initialized and a big loop is entered that loops 0x539 (1337) times with an inner loop that individually xor's every character in the provided 'input_buffer' with the 'xor_key' and stores it back in the buffer. After that the 'xor_key' is updated with the value of the character originally stored in the buffer before the first xor operation was performed. This might not be obvious from inspecting the code, so lets give a little example in pseudocode:
(i)  new_buffer_value = input_buffer[index] ^ xor_key
(ii) xor_key          = new_buffer_value ^ xor_key

I switched the arguments in (ii), this is not a problem
since XOR is associative and commutative. By expanding
new_buffer_value from (i) in (ii) we get:

xor_key = (inbut_buffer[index] ^ xor_key) ^ xor_key

because xor_key ^ xor_key = 0
and input_buffer[index] ^ 0 = input_buffer[index]

xor_key = input_buffer[index]
With this knowledge we can now build a pseudo encoding function in python that mimics what the original binary is doing.
1 2 3 4 5 6 7 8 | def enc(buffer):
xor_key = 0x50
for i in range(0,0x539):
for j in range(0,buffer_length):
o_val = buffer[j]
buffer[j] ^= xor_key
xor_key = o_val
return buffer
|
This leaves us with the last part of
sub_400702
which deals with the actual validation of the flag. It is a small loop iterating over a buffer I called
raw_flag
and comparing it to our encoded input. If all characters match, the function returns true (1) which then gets passed back up to the main function and results in "Correct!" being printed. The actual values of
raw_flag
are shown at the bottom of the image. It seems to be a null-terminated string of 0x21 (33) bytes length. This makes me assume that a valid input will have to match the size of the flag exactly (I basically hard coded the buffer_length to be 0x21).
The fun part
With the encoding implemented it is now possible to look for a solution to the problem. One such approach could include brute force, but that is not likely to work for a string of size 0x21. In fact I first tried to shift individual letters to see if I can bruteforce it in smaller pieces (byte-wise for example). As one would expect from PlaidCTF this was not the case, effectively denying the "easy way". So lets fire up everyone’s favorite problem solver: Z3. I will not go into details about its inner workings since it is not relevant for this article (and honestly I don't understand most of it). But thank god I don't have to understand it, I just have to know how to use it! With that being said, I will provide the source code of my script below and then explain the basic usage of Z3.
1 2 3 4 5 6 7 8 9 10 11 12 13 14 15 16 17 18 19 20 21 22 23 24 25 26 27 28 29 30 31 32 33 34 35 36 37 | import z3
from z3 import *
raw_flag = b"\x48\x5f\x36\x35\x35\x25\x14\x2c\x1d\x01\x03\x2d\x0c\x6f\x35\x61\x7e\x34\x0a\x44\x24\x2c\x4a\x46\x19\x59\x5b\x0e\x78\x74\x29\x13\x2c\x00"
def encode(buffer):
xor_key = 0x50
for i in range(0,0x539):
for j in range(0,0x21):
o_val = buffer[j]
buffer[j] ^= xor_key
xor_key = o_val
return buffer
s = z3.Solver()
flag_input = []
o_flag_input = []
for i in range(0,0x21):
ref = z3.BitVec(f"flag_{i}",8)
flag_input.append(ref)
o_flag_input.append(ref)
s.add(flag_input[i] > 0x20)
s.add(flag_input[i] < 0x7f)
encoded_input = encode(flag_input)
for i in range(0,0x21):
s.add(encoded_input[i] == raw_flag[i])
print(s.check())
m = s.model()
res = ""
for i in range(0,0x21):
c = m[o_flag_input[i]].as_long()
res = res + chr(c)
print("flag: ",res)
|
First the raw_flag is defined, which I copy-pasted from Binary Ninja. Directly beneath the encoding function is defined, it is very similar to the pseudo code shown above.
Now lets go to the juicy part (starting at line 16). First of all a solver object is created. This is necessary as it will hold all the constraints and is later used to effectively solve the problem. The following loop sets up 33
BitVec()
-objects with a size of 8 bytes (the second argument to the call) to model our input variables. Note that those values are stored in two arrays, the
flag_input
and
o_flag_input
where the former will be used for the computation and the latter will hold the orignal
BitVec()
-objects. This comes into play in a later stage of the script. The
s.add()
calls limit the possible input space to printable ascii characters, but this step is entirely optional and for optimization reasons (although I did not time if it would be slower without the restrictions).
Since Z3 supports symbolic execution on python, the rest is relatively trivial. The
flag_input
is passed into the
encode()
function and after encoding is done, the constraints. This is done with the
s.add()
so every char at the end of the encoding procedure matches the corresponding character in the
raw_flag
. With
s.check()
a sanity check is made if the model is satisfiable, this call also initiates the solving procedure. After that it is trivial to extract the input values from the resulting model by using the original
BitVec
-objects in the
o_flag_input
variable. Those are all concatenated and then printed as the final flag:
pctf{ok_nothing_too_fancy_there!}
For questions/suggestions you can reach me via twitter